Push and app messaging
Set up push and app messaging channels to deliver messages to your customers through your mobile apps.
App messaging is a secure messaging channel, and therefore requires you to authenticate users prior to them being able to use the service. Authentication can be performed by any authentication server or service that can issue a JWT (JSON Web Token). There are plenty of authentication platforms available to use that can issue tokens for your authenticated users, or use your existing systems.
Instructions to use the native push channels, such as APNS and FCM, are provided here.
Authentication setup
To see and configure your app messaging authentication:
- Log in to the portal.
- Go to Channels > Configure.
- Find the App Messaging section and select Authentication.\

Complete the fields on the form so that we can understand and verify your JWT tokens:

| Field | Description |
|---|---|
| Issuer | This should match the value of the iss (issuer) claim in your JWT. It is used to identify the principal that issued the JWT. The iss value is a case-sensitive string containing a unique string or a URL. |
| Audience | This should match the value of the aud (audience) claim in your JWT. |
| Shared secret | This is the secret used to create your signature for your JWT so we can ensure it has not been tampered with before accepting it. |
| ID Claim | This is the name of the claim in your JWT that should be used to identify a user, the sub claim is usually used. This is mapped to the ID field for a user's profile. |
Anonymous authentication
App messaging requires a JWT token in order to recognise users, but if you want to support anonymous users this is still possible by creating a unique user ID (such as a GUID) for them and issuing them a JWT. This process is sometimes referred to as self issued tokens.
There are two ways of creating a JWT for anonymous users:
-
Use the Session API to create a JWT
Call the Session API to generate an anonymous JWT. You can pass a user ID, which could be a GUID, and a nonce to ensure the JWT is the one you requested.The profile ID for the anonymous user is the passed user ID prefixed with anon_.
-
Use a self-issued JWT
With this option you must create a valid JWT matching the settings you entered into the App Messaging configuration; you have total control of the user ID and claims.There are plenty of code examples of how to create JWT online, and a lot of good information and code libraries can be found at the JWT home page.
Push configuration
To see and configure your app messaging native push channels:
- Log in to the portal.
- Go to Channels > Configure.
- Find the App Messaging section.
- Select the icon for Apple or Android to configure Apple APNS or Android FCM.
Android FCM setup
-
Open the Firebase Console.
-
If you haven’t created an API project yet, select Create Project.
-
Find your Firebase project and select the project name.
-
Go to Settings > Service Accounts.
-
Select the appropriate language for your SDK implementation.

-
Select Generate new private key, then select Generate key to confirm.
-
Securely store the JSON file containing the key.
-
In the Portal, go to Channels > Configure and then in the App Messaging section select the Android icon.
-
Select FCM Credentials.
-
In the pop-over, fill in the form with your Android package name and select the Upload private key field to upload the JSON file you stored in step 7.

Once this is done, ensure you have integrated the App Messaging SDK, so that you can test your settings.
Apple APNS Setup
We recommend using APNS tokensThe newer APNS token-based authentication is our preferred configuration for APNS as it works for apps published under an Apple Developer account, and does not expire, unlike the APNS certificates which expire annually.
You have two options for setting up APNS. You can use either the newer APNS token-based authentication system (recommended), or individual APNS certificate per app bundle.
APNS Tokens
- Log in to your Apple Developers Portal.
- Select Certificates, IDs & Profiles.
- Go to Keys > All.
- Select the + icon to create a new key.
- Enter a name for the key and ensure the Apple Push Notifications service (APNs) option is selected.
- Create the key.
- Download the key and store it securely; also note down the Key ID displayed.
- Log into the Portal.
- Go to Channels > Configure, and in the App Messaging section, select the Apple icon.
- Select APNS Token.

APNS token settings
- Select the Upload private key field and upload the APNS Private key file (p8 file) you downloaded in step 7.
- Enter the Key ID you noted down in step 7.
- Enter your Team ID.
You can find this in the Apple Developers Portal under the Membership section. - Select Save.
Now ensure you have integrated the App Messaging SDK, so that you can test your settings.
APNS Certificates
APNS certificates must be refreshed annuallyAPNS certificates are only valid for one year. You need a new one generated annually for each app and the p12 certificate extracted and uploaded to the portal. Ensure you have reminders set to do this in good time prior to your certificate expiry.
If you already have an APNS certificate you can skip to step 6.
- Create a new App ID or find your application.
- Request the certificate.
- Configuring an App ID for Push Notifications.
- Download the certificate.
- Create the provisioning profile.
- Upload your APNS certificate.
Create a new App ID or find your application
If you already have an App ID in the Apple Developer Member Center, follow these steps. If you don’t, skip to step 2.
-
Log in to the Apple Developer Member Center.
-
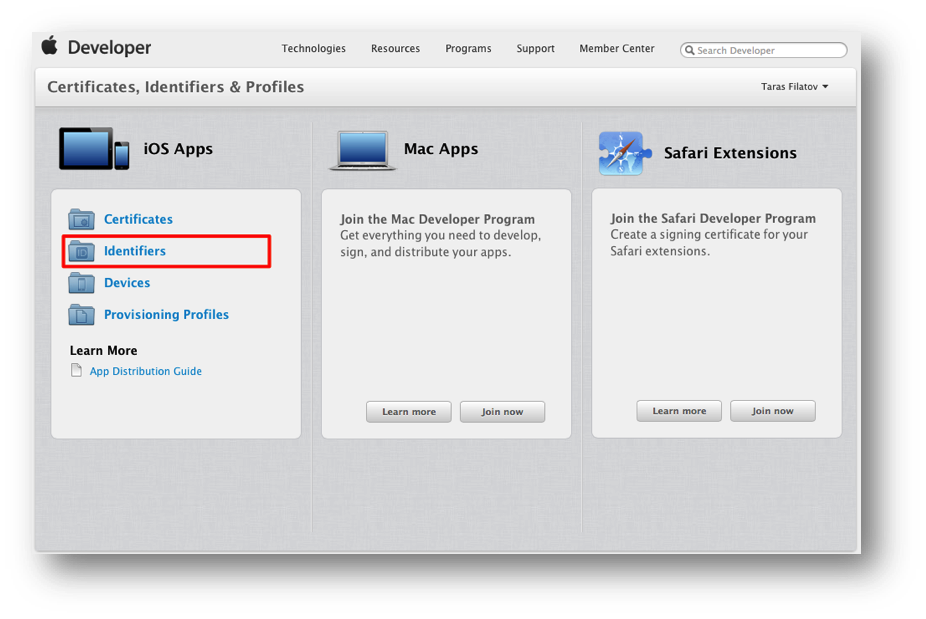
Select Identifiers under iOS Apps and locate your application in the list.\
-
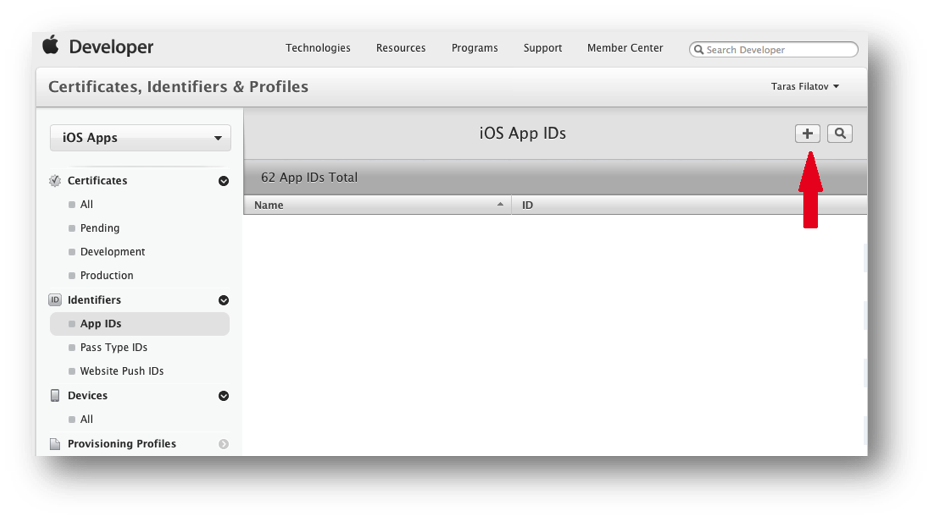
If you haven't registered an App ID yet, select the + symbol and fill out the form. You must select the Push Notifications checkbox.
Wildcard IDs cannot use the push notification service.
-
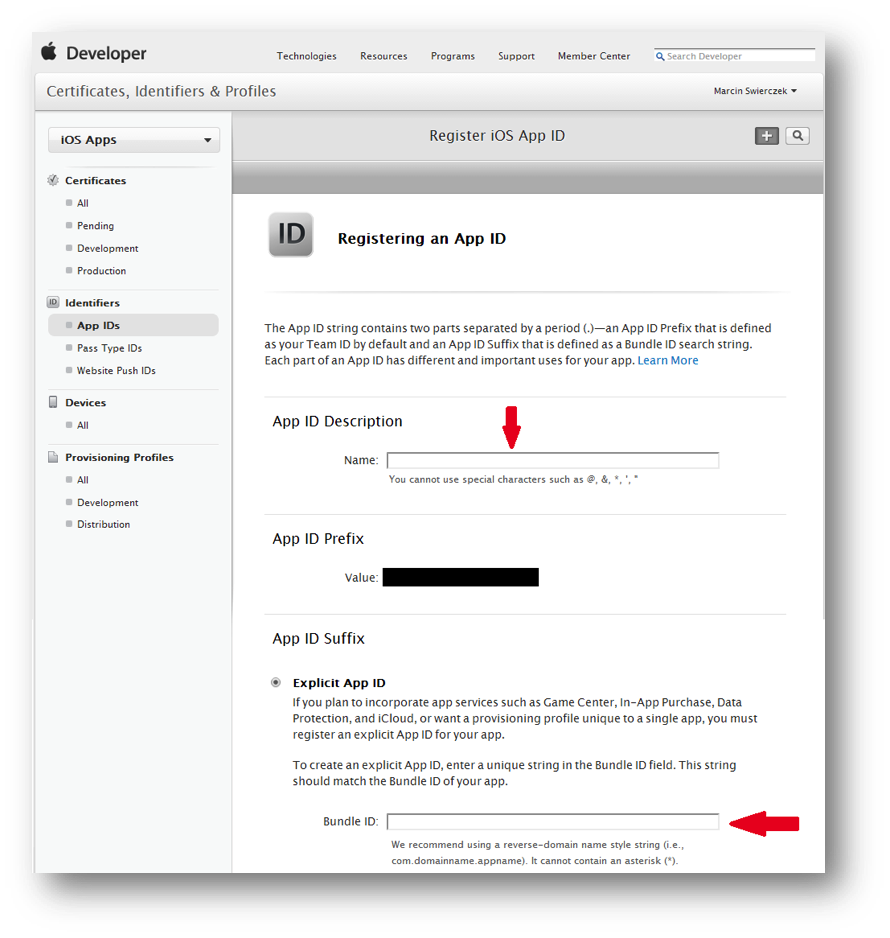
Register a new App ID:
- Enter your App ID Description(for example, PushAppID), and select an App ID Prefix.
- Under App ID Suffix, select Explicit App ID, and provide the correct Bundle Identifier in the form
com.company.application, for example,com.mobiledonky.MyPushApp.
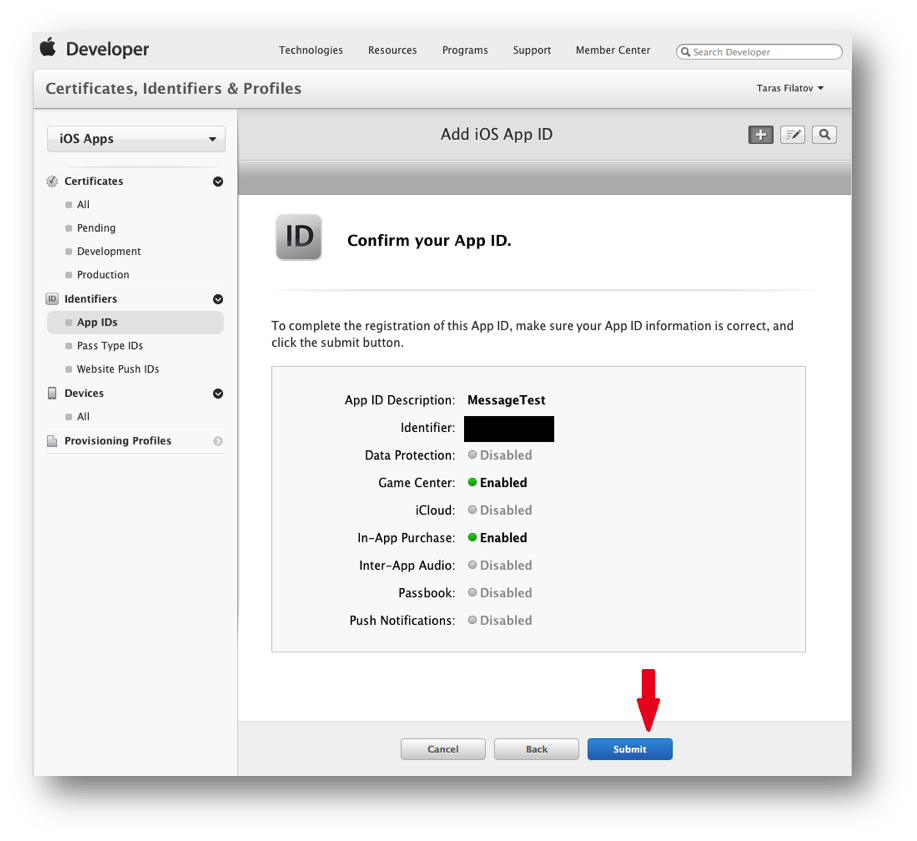
- Select Submit.
Request the certificate
-
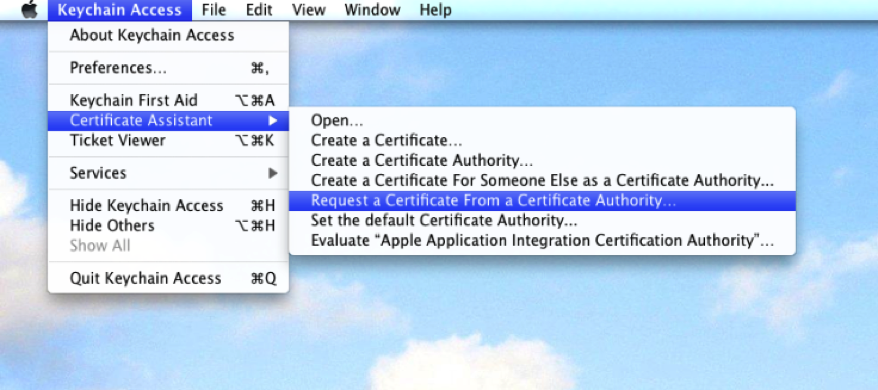
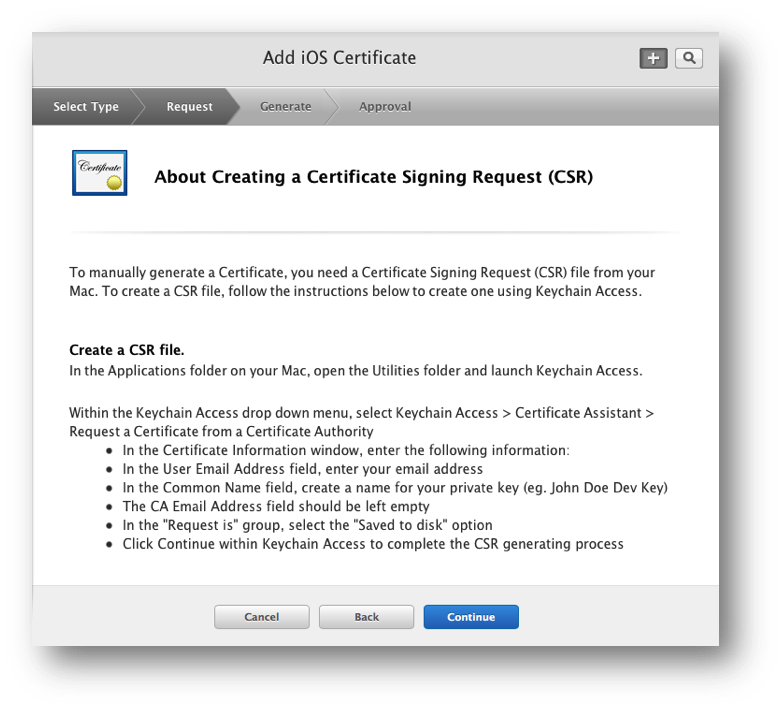
Generate a certificate request file using Keychain Access on your OS X Machine.

Tap cmd + space to bring up Spotlight.
- Go to Keychain Access > Certificate Assistant > Request a Certificate From a Certificate Authority.\
-
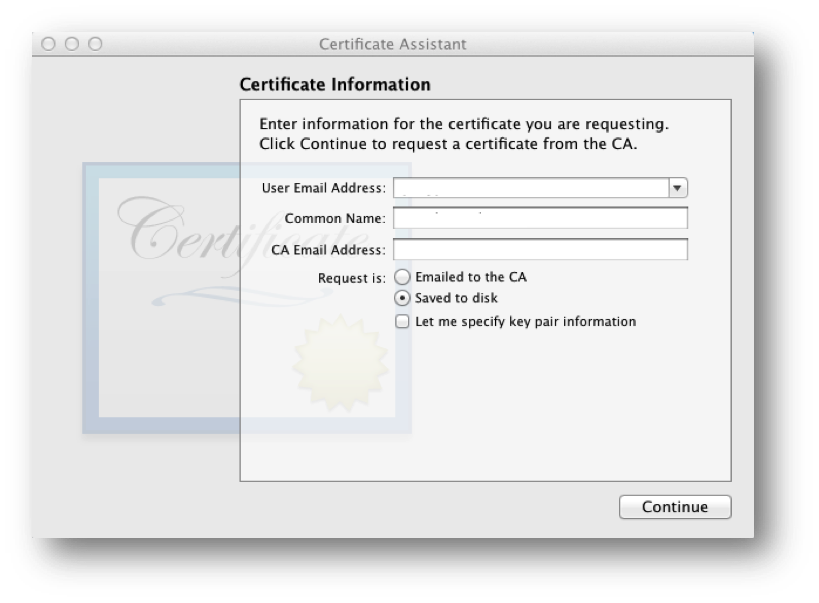
Enter the required information and select Saved to disk, then select Continue.
-
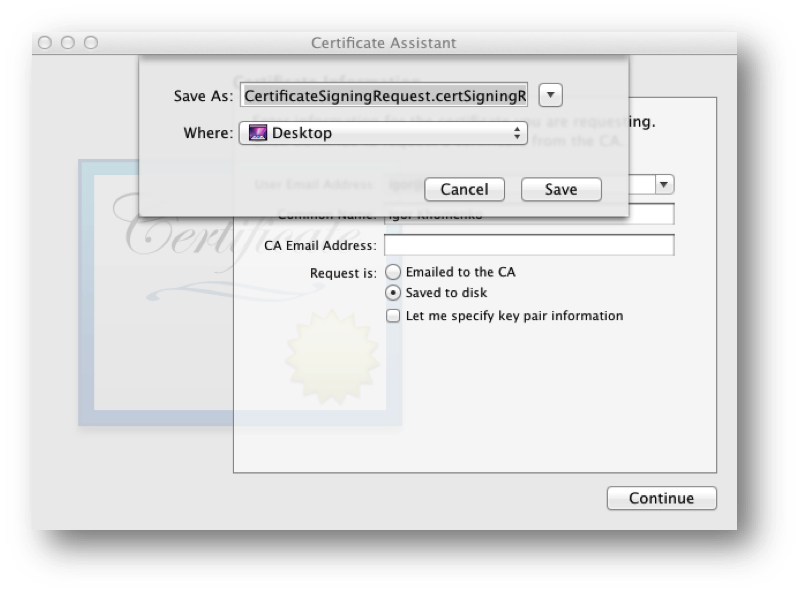
Save the certificate request using the suggested name and select Save then Done.
Configure an App ID for Push Notifications
Once an App ID is created, you need to configure it for push notifications.
-
Select Settings to configure Push Notifications for your App ID.
-
Select the check box to activate Push Notifications for the App ID, then select Create Certificate.
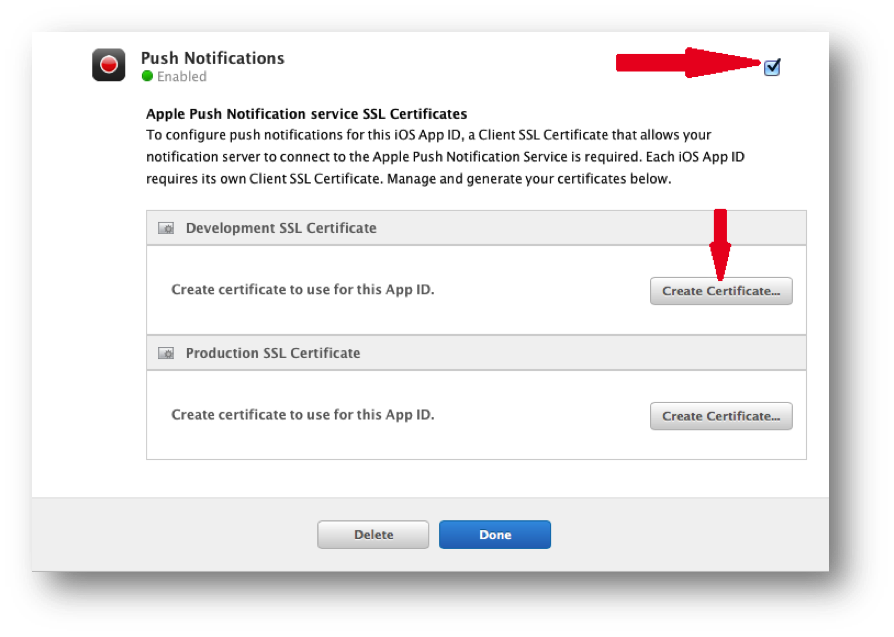
-
You see the Apple Push Notification service SSL Certificate Assistant screen. Select Continue.
-
Select Choose File to locate the Certificate Request file that you saved earlier. Select Generate.
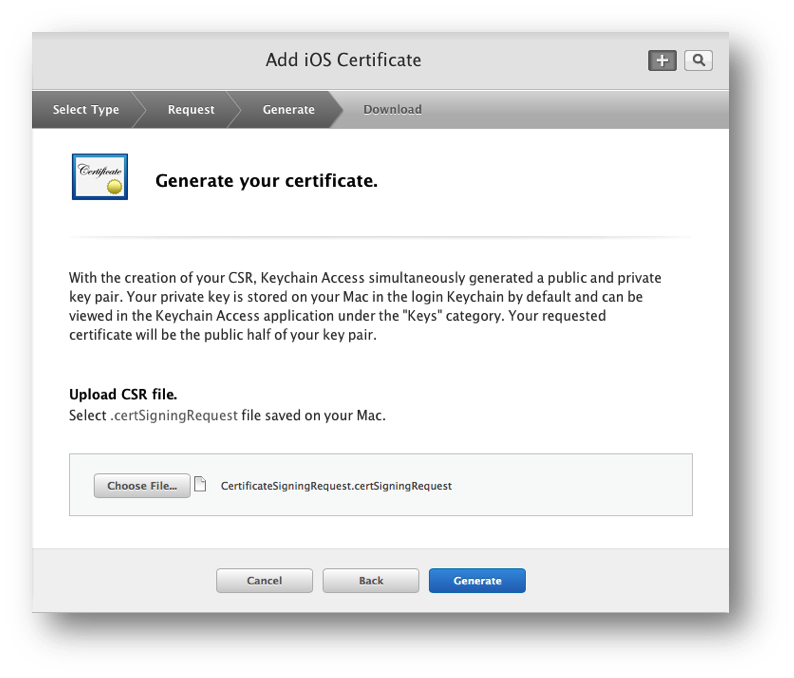
- Your SSL Certificate is now generated. Select Continue and then Done.
The same process as outlined above applies when generating the production certificate.
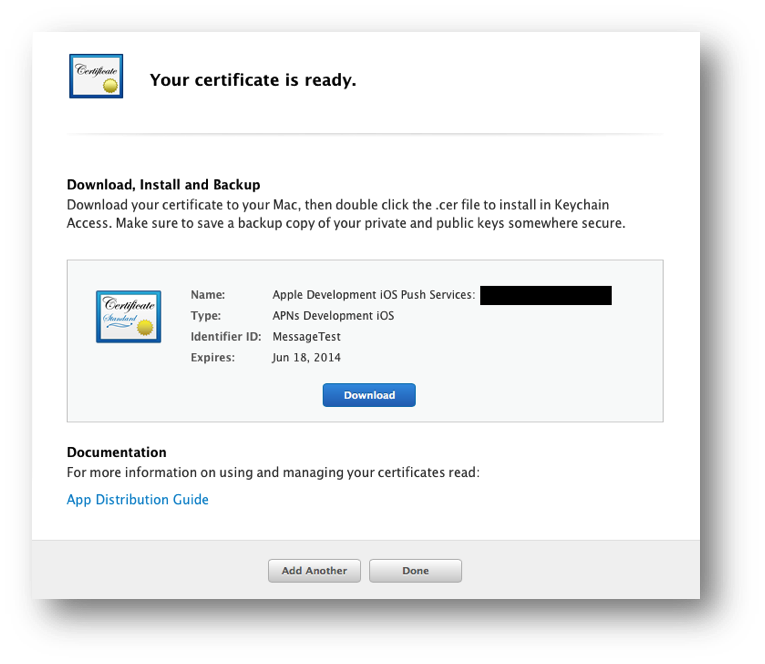
Download the certificate
-
Select Download.
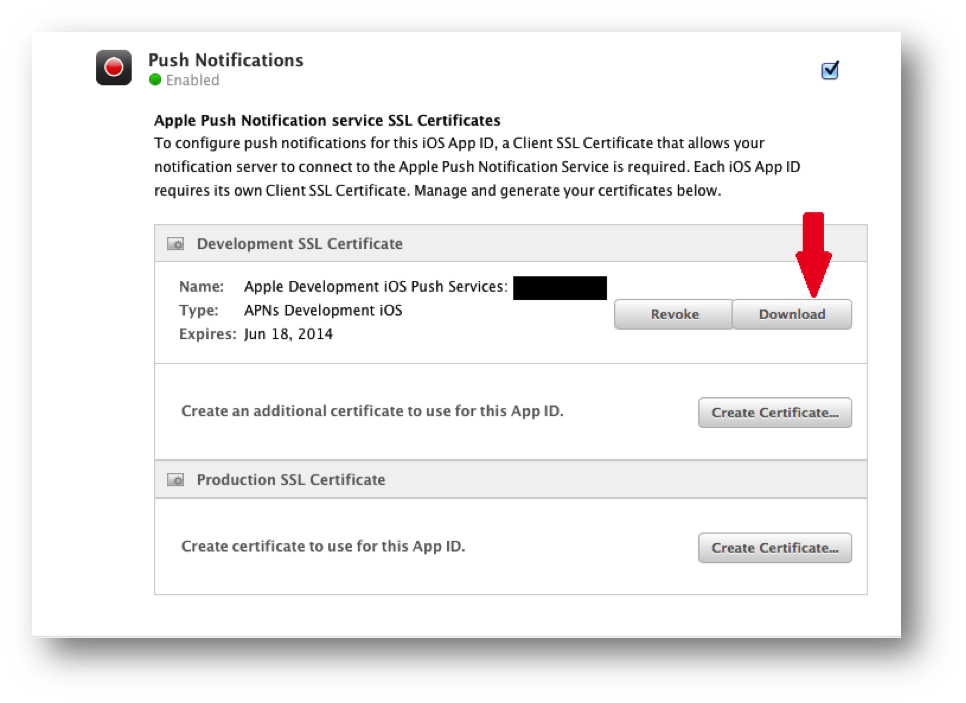
-
The SSL Certificate that you download is named
aps_developer_identity.cer. Double-click on it to install it in the Keychain Access application.The SSL certificate is used by your provider application so that it can contact the APNs to send push notifications to your applications.
-
Launch Keychain Assistant and from the login keychain, filter by the Certificates category.\
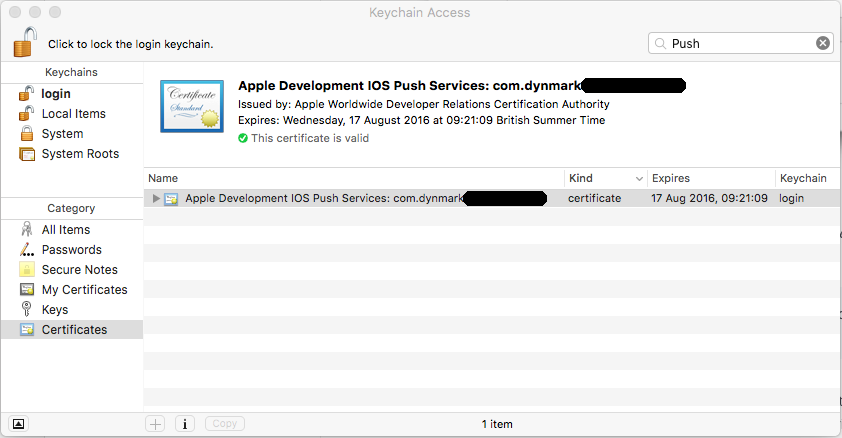
Private Key Only
In the following step, ensure you only export the private key (child item) not the whole certificate. Only the private key is required for Inbox to connect to APNS.
- Expand the Apple Development/Production iOS Push Services option, and then right click on Apple Development iOS Push Services.
- Export Apple Development/Production iOS Push Services... . Save this as
apns-dev-cert.p12. - Enter the password for exporting.
This is an optional field.
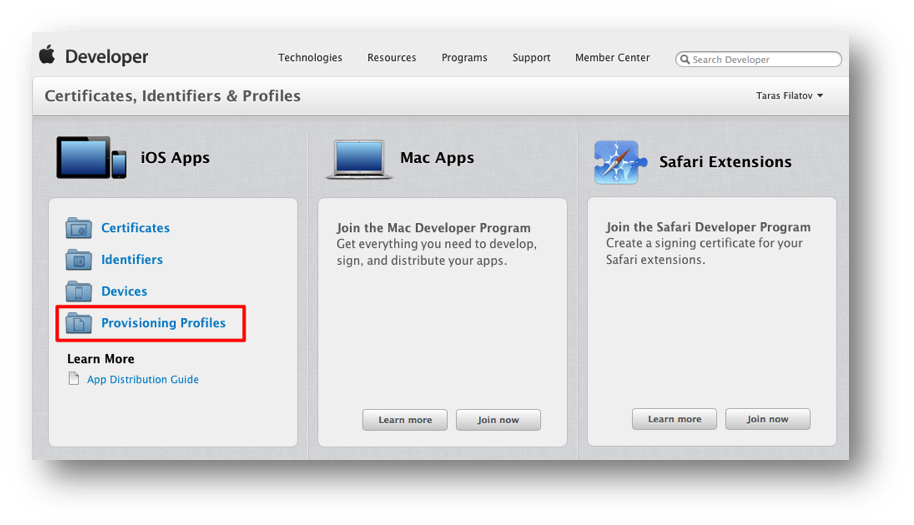
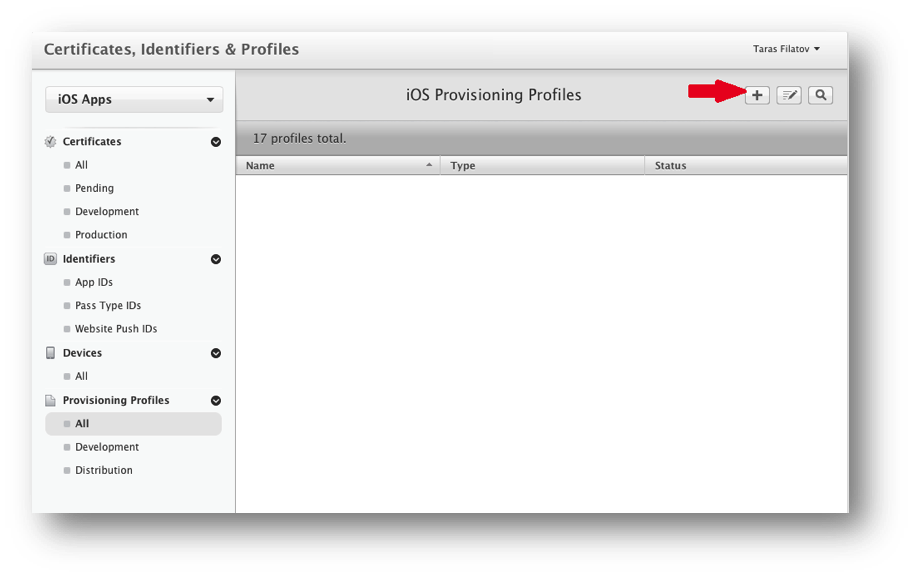
Create the provisioning profile
-
Select Provisioning Profiles under iOS Apps.
-
Select the + icon to create a new provisioning profile.
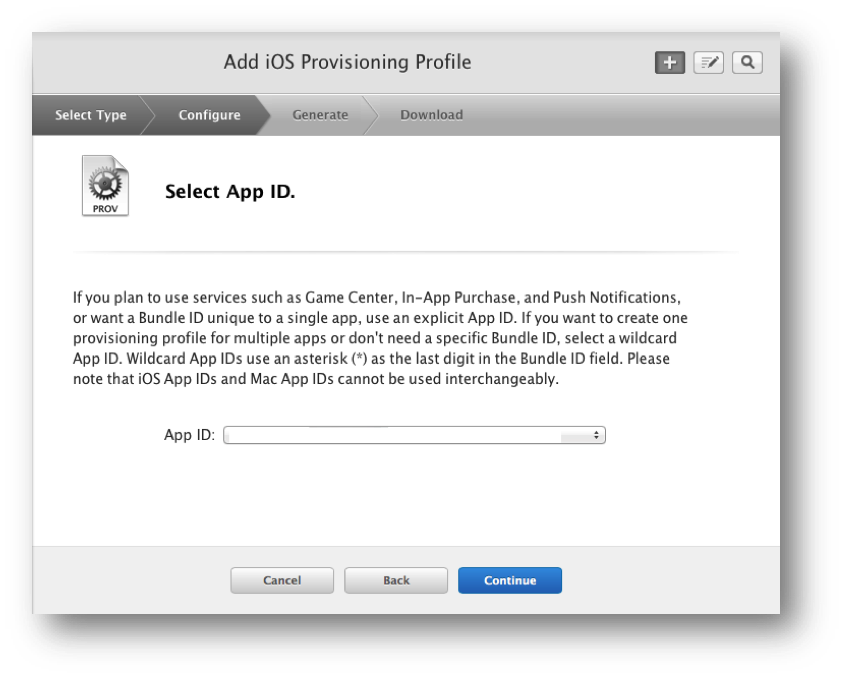
-
Select the type of provisioning profile you need to create, then select Continue.
-
Select the App ID you are creating the provisioning profile for.
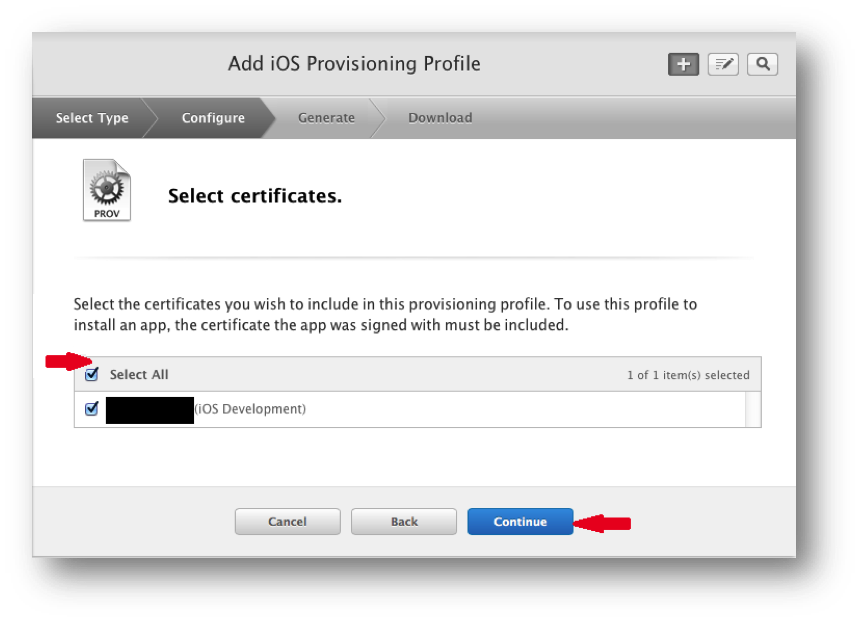
-
Select the certificates you want to include in this provisioning profile, then select Continue.
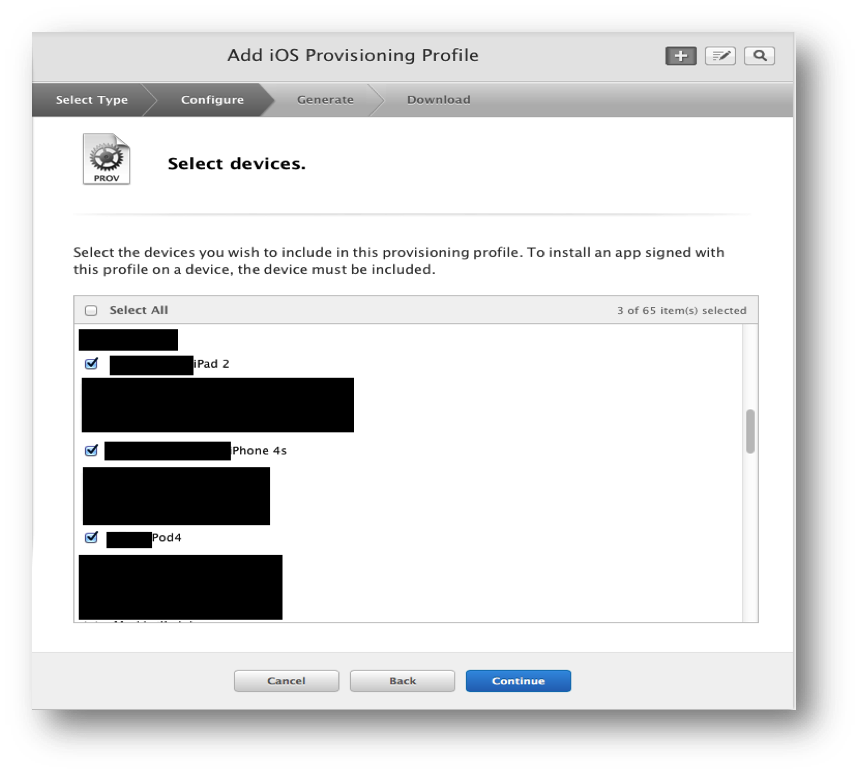
-
Select the devices you want to include in this provisioning profile, then select Continue.
-
Enter the Provisioning profile name then select Generate.

-
After the generating of the Provisioning Profile is finished, a screen displaying the information and available options appears. Select Download.
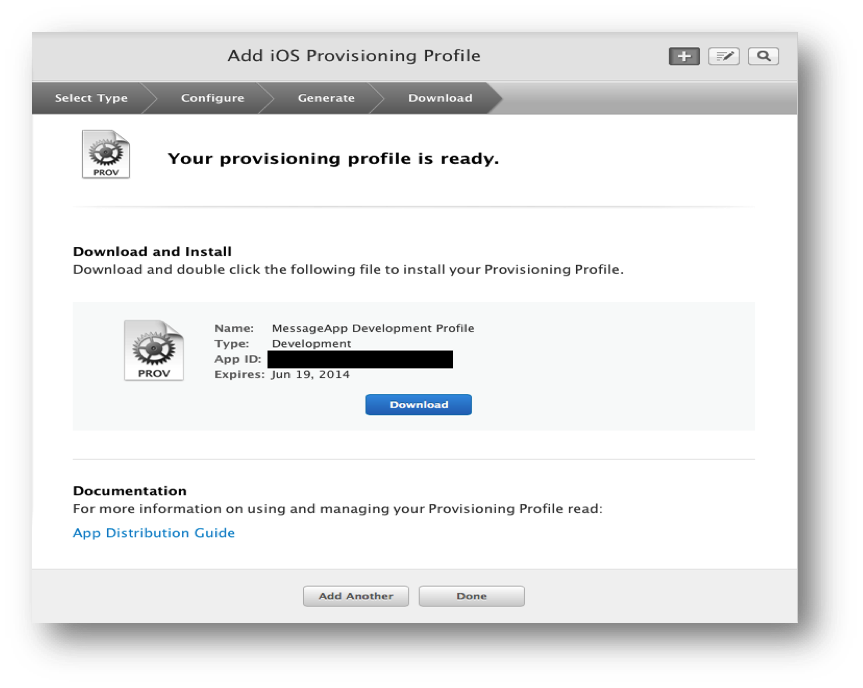
You can download the Provisioning profile later. Open a list with all Provisioning profiles and select the required profile. Additional options become available.
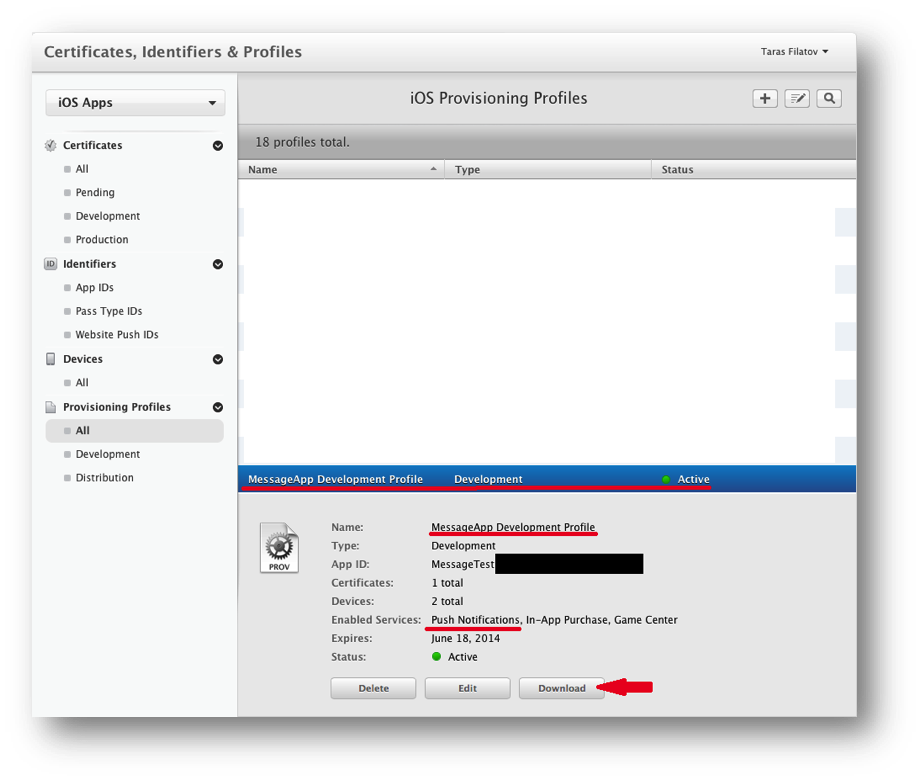
-
Open the downloaded profile file.
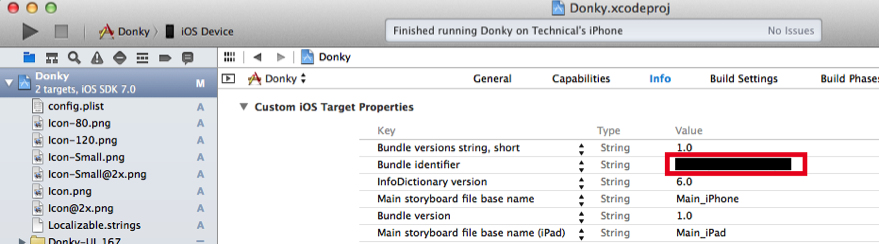
-
Open your application in Xcode, go to Project structure, select *.plist file and make sure that the Bundle ID in your Xcode project's info.plist matches that of the Provisioning profile.
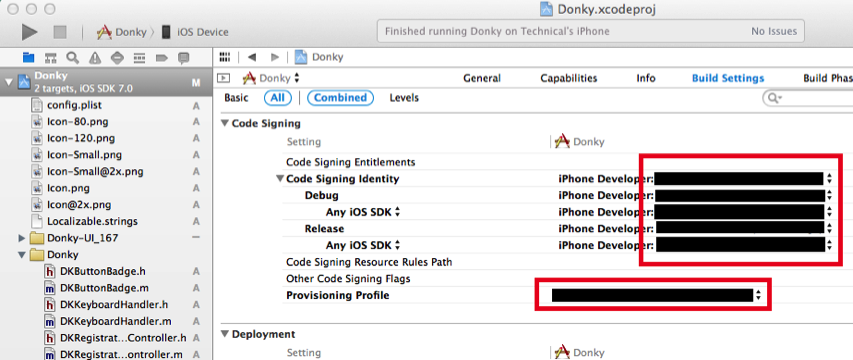
-
Go to Build Settings > Code Signing > Code Sign Identity > Provisioning Profile and select your Provision Profile.
-
Run the application.
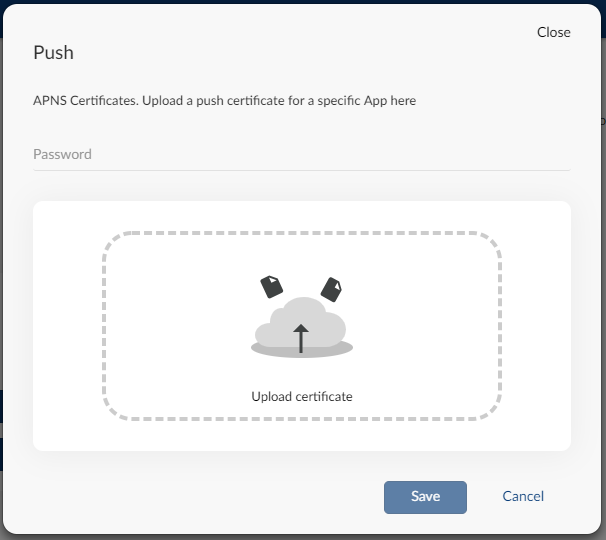
Upload your APNS certificate
- Login to the Portal.
- Go to Channels > Configure, and find the App Messaging section.
- Select the Apple icon, and then select APNS Certificates.
- Select the Upload certificate field.
- Select your certificate file in the file dialogue.
- Enter your certificates private key password, if set.
- Select Save.
Now ensure you have integrated the App Messaging SDK, so that you can test your settings.